
Configuring an Automatic Deployment Rule (ADR)

Full-Access Members Only
Sorry, this lesson is only available to Server Academy Full-Access members. Become a Full-Access member now and get instant access to this and many more premium courses. Click the button below and get instant access now.
Instructions
Q&A (0)
Notes (0)
Resources (0)
Saving Progress...
Resources
There are no resources for this lesson.
Notes can be saved and accessed anywhere in the course. They also double as bookmarks so you can quickly review important lesson material.
- The purpose of this lecture is to demonstrate how to automate the collection of new updates and deliver them to clients.
- From the workspace, if we click software library then in the navigation pane we click all software Updates. What we see here is a synchronization of windows defender updates from Microsoft online.
- Notice that some file definitions have an icon with an x.
What this means is that these x’s represent outdated definitions. So, what we will want to do is filter out the irrelevant definitions and create a current list of updates for windows defender that we will send out to our Endpoint Protection clients.

To accomplish this, we need to configure a Search
- From the search bar, click the Add criteria button, Scroll down and click expired, scroll down then check product, click add.

- On the left side, right under the search bar, by AND expired click Yes, then change this setting to NO
- To the right of And Product, click the underlined selection, Scroll down and click Widows Defender.
- From the search bar, click the search button, now you have a filtered list of unexpired windows 10 defender updates.

- So you might ask, How does this work with the Automatic Deployment Rule?
Create a Software Update Group
- What we are going to do is select all the updates, by pressing (Ctrl – a)
- Right-click and select create software update group.
This group represents like the name implies a group of updates. We will use this group with our automatic defender rule.
- Name, type Windows Defender Updates, click create.
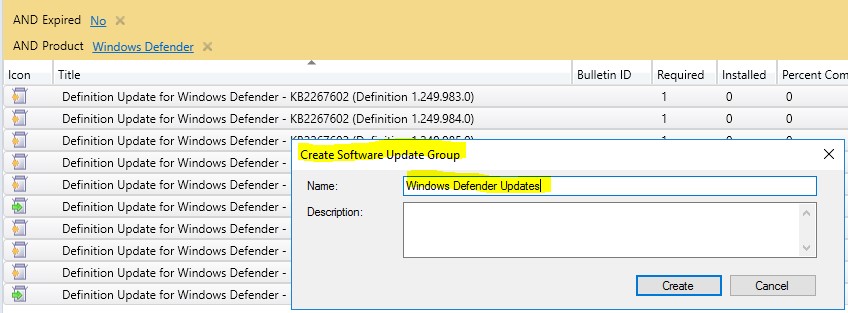
On the left, click software update group, on the right you can see the software Updates Group of updates called Windows Defender Updates, has been created.
- That is important because when you create an automatic deployment rule, on a scheduled basis the ADR will look for new updates and put them into an existing software update group, in this case, the Windows Defender Updates group, and then deploy them out to clients.
- From the Navigation Pane, right-click Automatic Deployment Rule, click create Automatic Deployment Rule.

- Type a Name – Deploy Windows Defender Updates,

- Specify a device collection – Click Browse, in this case, I choose windows 10,

- Click add to an existing update group, here you will be adding new updates to an existing update group, called Windows Defender Updates group, click next.
- From deployment settings, click next.
- From Software Updates, click Product, click next.
- Besides product click items to find and scroll down and check windows defender, click ok, then click next.

- From Evaluation Schedule, click run the rule after any update synchronization. This setting is going to be looking at new updates after SCCM synchronizes its update, click next.
- From Deployment Schedule – Select as soon as possible for both settings then click next.

- From User experience, User notifications, click the down arrow and select Display in software center and show all notifications, click next.
- From Alerts, check generate an alert when this rule fails, click next.
- From Download settings, accept the defaults, click next.
- From Deployment Package, we need to create a new deployment package which is used to download the updates. You might ask, aren’t the updates downloaded? What did we see in Configuration Manager? What we saw was the meta-data, stored in the configuration manager database and not the actual binary files.
- From Name, type Defender Deploy Package. This needs a location to store the actual binaries on the network.
- From Package Source. Specify a UNC path to a shared folder that has already has been created. In this case, I type \\ITFSCCM01\EPUpdates, Click next.
Server Academy Members Only
Sorry, this lesson is only available to Server Academy Full Access members. Become a Full-Access Member now and you’ll get instant access to all of our courses.


