Installing and Configuring System Center Configuration Manager (SCCM)
Getting Started with this Course • 26min
0 / 3 lessons complete
SCCM Configuration Manager Overview
Video | 8 min
Prerequisites in a Production Environment
Video | 12 min
Configuration Manager Overview Section Quiz
Quiz | 6 min
System Center Configuration Manager - Features and Capibilities • 31min
0 / 5 lessons complete
Asset Management
Video | 6 min
Administrative Tasks
Video | 5 min
Client Management Part 1
Video | 7 min
Client Management Part 2
Video | 5 min
Features and Capabilities Section Quiz
Quiz | 8 min
SCCM 1902 Lab Setup • 50min
0 / 12 lessons complete
This section is optional
Text | 1 min
Lab Overview
Video | 4 min
Downloading and Installing VirtualBox
Video | 2 min
Creating Your NAT Network and VMs
Video | 4 min
Downloading and Mounting Server 2019 ISO
Video | 2 min
Installing Windows Server 2019 Part 1
Video | 4 min
Installing Windows Server 2019 Part 2
Video | 3 min
Downloading and Mounting Windows 10 ISO
Video | 2 min
Installing Windows 10
Video | 4 min
Configuring SADC01
Video | 15 min
Configuring our SAWS01 Workstation
Video | 4 min
Configuring our SASCCM01 Server
Video | 5 min
Installing SCCM 1902 Installation • 1hr 17min
0 / 11 lessons complete
SCCM Compatability Check
Video | 2 min
Download Required SCCM Software
Video | 2 min
Installing the ADK
Video | 2 min
Creating the System Management Container
Free lesson
Video | 4 min
Creating Domain User Accounts
Video | 8 min
Extending the Active Directory Schema
Free lesson
Video | 5 min
Configure Windows Firewall with Group Policy for SCCM
Video | 7 min
Install SQL Server 2017
Video | 9 min
Installing SCCM Dependent Server Roles
Video | 3 min
Installing System Center Configuration Manager
Video | 5 min
Lab: Installing System Center Configuration Manager
Lab | 30 min
Configuration Manager Basics • 1hr 53min
0 / 8 lessons complete
Console Overview Part 1
Video | 12 min
Console Overview Part 2
| 5 min
Site System Roles
Video | 9 min
Creating and Managing Administrative Users
Video | 6 min
Creating Boundary and Boundary Groups
Video | 4 min
Client Discovery Methods
Video | 7 min
SCCM Basics Section Quiz
Quiz | 10 min
Lab: SCCM Basics
Lab | 60 min
Updating SCCM • 30min
0 / 7 lessons complete
Understanding Windows ADK Compatibility
Video | 4 min
Configuration Manager Update Overview
Video | 6 min
How to Verify Your ADK Version
Video | 2 min
Installing ADK 1903
Video | 2 min
Updating SCCM
Video | 4 min
Verifying Our Configuration After Update
Video | 6 min
Updating SCCM Section Quiz
Quiz | 6 min
SCCM Client Installation • 46min
0 / 4 lessons complete
Preparing for Client Installations with Group Policy
Free lesson
Video | 12 min
Client Push Installation
Free lesson
Video | 11 min
Deploying the SCCM Client with Group Policy
Video | 17 min
Manual Client Installation
Video | 6 min
User and Device Collections • 1hr 0min
0 / 13 lessons complete
Collections Overview and the Direct Rule
Video | 9 min
Creating Include/Exclude Collections
Video | 5 min
Query based User and Device Collections Introduction
Video | 2 min
Query Based User Collections Example #1
Video | 5 min
Query Based User Collections Example #2
Video | 3 min
Query Based User Collection Challenge #1
Video | 2 min
Query Based Device Collection Example #1
Video | 3 min
Role Based Administration
Video | 2 min
Assigning a User Collection to an Administrative Security Roll
Video | 10 min
Using a Collection to Enforce a Maintenance Window
Video | 4 min
Deploying Power Management to a Collection
Video | 6 min
Using a Collection to Turn-On the Remote Control Feature
Video | 4 min
User and Device Collection Section Quiz
Quiz | 5 min
Application Management • 2hr 34min
0 / 12 lessons complete
Application Management Overview
Video | 7 min
Creating an Application using an MSI Part 1
Video | 9 min
Creating an Application using an MSI Part 2
Video | 9 min
Supersedence Part 1
Video | 7 min
Supersedence Part 2
Video | 8 min
Creating an Application using an EXE
Video | 16 min
Creating an Application that requires Approval
Video | 12 min
Creating a Package using an MSI
Video | 9 min
Uninstalling an Application
Free lesson
Video | 5 min
Monitoring Applications
Video | 4 min
Lab: Application Deployment
Lab | 60 min
Application Management Section Quiz
Quiz | 8 min
Operating System Deployment • 23min
0 / 7 lessons complete
Create a Windows 10 Collection
Text | 2 min
OSD - The Basics
Video | 3 min
Setting Up a DHCP Server
Video | 2 min
Adding an Operating System to Configuration Manager
Video | 6 min
Create a Deployments folder for the Captured Image
Text | 1 min
Creating a Task Sequence
Video | 5 min
Enable PXE Support - Configure WDS
Video | 4 min
Endpoint Protection • 1hr 12min
0 / 10 lessons complete
An Overview of Network Security
Video | 8 min
Endpoint Protection Server Prerequisites
Video | 6 min
Endpoint Protection Licensing
Video | 1 min
Endpoint Protection Planning and Integration
Video | 5 min
Create a Shared Folder Named EPUdates
Text | 2 min
Endpoint Protection Server Configuration and Installation
Video | 9 min
Endpoint Protection Policy Overview
Video | 13 min
The Anti-malware Policy Settings Overview
Video | 7 min
Configuring an Automatic Deployment Rule (ADR)
Video | 7 min
Endpoint Protection Client Installation
Video | 14 min
Troubleshooting • 37min
0 / 4 lessons complete
SCCM Troubleshooting Overview
Video | 7 min
The CMTrace Overview
Video | 8 min
Deploying CMTrace to a Device Collection
Video | 7 min
Troubleshooting a failed Client Push Install
Video | 15 min
Problems and Solutions from the Message Board • 14min
0 / 5 lessons complete

Saving Progress...
In this lecture, we are going to deploy the Configuration Manager client using the Client Push method.
Now, if you are working in a lab environment, make sure you have your Domain Controller, your SCCM, and your Workstation VMs all powered On before proceeding on to this lecture.
We are also going to be switching between the SCCM server and our Windows 10 VM quite frequently, so be prepared to do that.
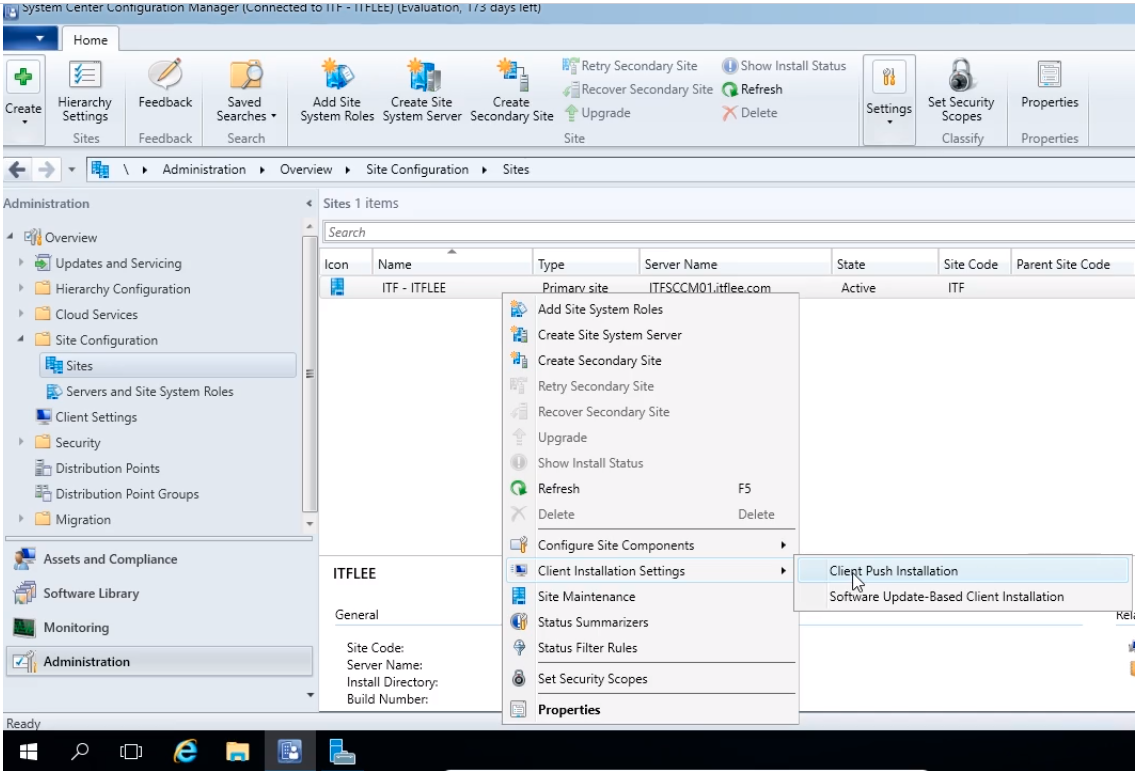
Before we attempt a client push, we need to make sure that SCCM will use a Domain Administrator account to install the client. We can do this by navigating over to the Administration tab, and selecting Site configuration, Click on Sites, and right-click on our server, and Client Installation Settings, click on Client Push Installation.
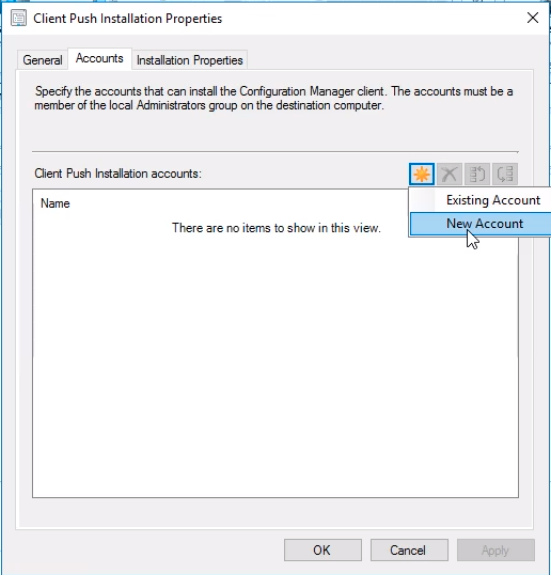
It's going to open the Client Push Installation Properties.

We click on the Accounts tab and we can see that there’s no account listed here. So we are not going to be able to do any kind of Client Push because we are not specifying an account.
What we need to do is click this Star button up here and select New Account.
Even though we are not creating a new account, as far as the Configuration Manager is concerned, there is no account specified and we are going to do that now.

Click the Browse button.

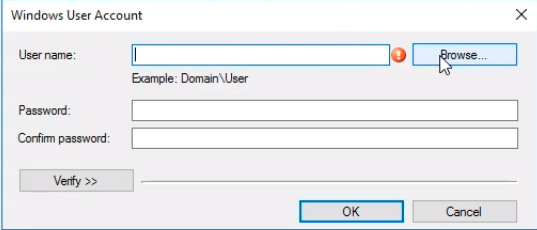
And we are going to search for SCCM Admin. Click Check Names and we can see that the username is resolved.
You could create a special SCCM client installation user account if you would like, the only thing you need to make sure you do is add it as a member of the Domain Administrators group.
We are just going to use the SCCMAdmin account in this example. Click OK.

Now, you need to type the password for this account. It is really important that you get this password correct, so the way we can test that is by selecting the Verify button.

We can choose a Network Share. And, under the Network Share, I am going to type in \\ITFDC01 and we are going to click Browse.

And we can see we can select netlogon. Click Select Folder.

Now, click the Test connection button.

And, we can see that The connection was successfully verified. Click OK.

And, click OK again.

Now we can go back to the General Tab. What we can do is Enable automatic site-wide client push installation if we would like. Now, I don’t see a need to do this, so I am not going to.
If you are dealing with thousands of computers and you want them all to have the client you can do that. In my lab environment that is not necessary.
Now, we can install the Client Configuration manager on domain controllers if we would like, I am again not going to do this as I only want to install this client on my Windows 10 workstation.

Now, under Installation Properties we can see here that we have the SMS Site Code as ITF. We can specify more properties here but for the majority of us, we will not need to do any of this.
So, I am just going to click on Apply and click OK.

Now, what we need to do now is go back to Assets and Compliance and select Devices. And, here is our Target computer. This is where we want to install the Client on.
The way you do this is by right-clicking and choosing Install Client, but before we do that we would like to start a log tool called cmtrace.
We can find that by opening File Explorer and navigating to This PC > C:\ > Program Files > Microsoft Configuration Manager > tools (click Continue if you see a popup) > cmtrace.

You might want to drag it to the ToolBar as this is one of the key troubleshooting tools when you are working with System Center Configuration Manager.
You can also access this tool from the network by typing \\ITFSCCM01\sms_itf\tools\smtrace.
So, you can access this from the network or directly on your SCCM server.
I am going to power on this cmtrace and click Yes on Do you want to make this program the default viewer for log files.

And, what we need to do is click File > Open.

Click This PC > C:\ > Program Files > Microsoft Configuration Manager > Logs (click Continue and Yes if you don’t have permissions) > ccm.log.
Click Open.

This Log file is going to list any Errors or any Issues that we may experience on the server-side when we attempt to deploy this client.

Now, what we are going to do is make sure we are logged into this Windows 10 workstation.
Right-click on the Taskbar and choose Task Manager.

Click on More Details to expand the view and I am just going to leave it up at the Processes tab. Once we start the installation we will see the process listed as ccmsetup.exe.

Switch back to our Configuration Manager server and I am going to right-click on ITFWS01 and select Install Client.

Now, we are presented with a windows screen of the Install Configuration Manager Client Wizard.
In the Before you begin window we have basic information just stating a couple of things that can cause the client to fail during installation.
We have met the requirements listed so we click on Next.

Now, we have three options that we can choose here:
We can allow the client software to be installed on domain controllers. Since we are pushing this to a Windows 10 workstation there’s no reason to check this checkmark.
Always install the client software. Now this is an unnecessary option as we have not yet installed the SCCM client. So, if it is already installed and we would like it to force it to update we can do that right now. We can repair it, upgrade, or reinstall the client software. We have no need to do this since the client software is not there anyways.
Install the client software from a specified site. We only have one site anyways, but if we have about five sites we want to manually choose a site. Now, this would be useful if we are deploying this to about 50 computers or 5,000 computers and you have five sites, and you knew one site had a higher load than the other, you could choose the site with the lower load and therefore you could do a little bit of load balancing.
We don’t need to do any of these so click on Next.

We choose Next again.

And, we are going to click on Close.

Now, let’s switch over to the cmtrace window.
Here we can see the request received for ITFWS01, it received the ITFWS01, is connecting to the Admin share.

And we see some errors like it was not able to connect to WMI root, and that’s fine, we are just going to ignore that error at this time, and we can see at the bottom the End request.

So what we are going to do now is switch over to our workstation.
And, we can see here the ccmsetup.exe is currently running.

Now, again, we can open from File Explorer the cmtrace tool by typing \\ITFSCCM01\

Type the domain administrator account.

Open the sms_itf shared folder.

Select the tools folder and double-click on cmtrace.

Click Yes on the popup window.

Click File > Open.

Click This PC > C:\ > Windows > ccmsetup (click continue and Yes if you don’t have permissions) > Logs > ccmsetup.
Here we can see ccmsetup has created a log file. Click Open.

We can see here that the installation is in progress.
You might see some errors listed here, but not all errors are an issue. Sometimes errors happen. You will see a lot of red and a lot of yellow. Sometimes they are informational messages.

Now, let’s switch back to Task Manager to check on the process.
It seems ccmsetup.exe has finished executing.

So, what we are going to do now is click the Start button and type in Control Panel.

Change the view to Small Icons.
We can see here that we have Configuration Manager successfully installed.

So if you see this entry you know that the client is installed and you can click on it to see the properties.

Let’s switch back over to our SCCM Server. Under Devices click the refresh button on the upper right of the window.
We can see the Client column says Yes. But we have a question mark and it doesn’t say active yet.
So in about 15 to 30 minutes if I leave all the VMs on the client activity will switch to active, and you really need to see that client active as Yes when you are working with SCCM.
If the client is not active, if it is blank like this within an hour that means I am not going to be able to administer this system through SCCM because the client is inactive.

Alright, so it’s been around 15 minutes since I installed the client and now we can see here under Client Activity that it is Active.

If you power off your workstation, or become offline, or you power off the VM, this client activity might go away and you might get an X. What that means is that you just need to power on the workstation and give it 15 minutes and it should go active again.

Saving Progress...