The Text Based Console Part 1- An Overview

Full-Access Members Only
Sorry, this lesson is only available to Server Academy Full-Access members. Become a Full-Access member now and get instant access to this and many more premium courses. Click the button below and get instant access now.
Instructions
Q&A (0)
Notes (0)
Resources (0)

Saving Progress...
Resources
There are no resources for this lesson.
Notes can be saved and accessed anywhere in the course. They also double as bookmarks so you can quickly review important lesson material.
Before we dive into the Console I need to tell you about the difference between running PowerShell in Normal Mode as opposed to Administrator Mode.
If you log into a Windows computer with user level security rights normally you won’t have the rights to be able to do things like change printer drivers, or read the system’s log file.
So, if I logon as a normal user PowerShells abilities will be limited as well.
Whatever system rights that the currently logged on user possesses, that’s how the PowerShell console will work.
I just wanted you to understand that you can run PowerShell in normal mode but your capabilities to run certain commands will be limited.
So how do you find PowerShell?
Click the search bar, type PowerShell.
Here we have Windows PowerShell, and Windows PowerShell ISE. These are our 64 bit versions of PowerShell.
Then we have x86 and Windows PowerShell ISE x86. These are our 32 bit versions of PowerShell, which we won’t be using in this course.
So if I just double click on Windows PowerShell I will be running in Normal User Mode.
That’s not what we want. I’m gonna to show you how to Pin PowerShell to the taskbar then customize it to run as administrator.
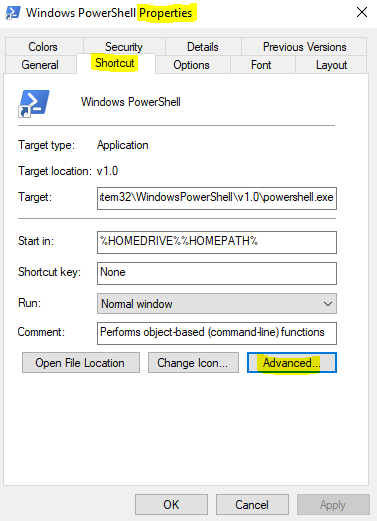
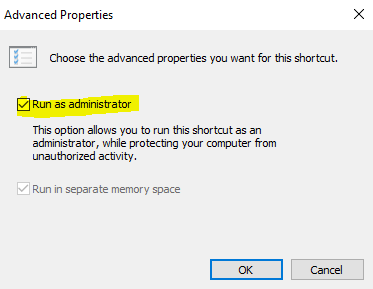
So go ahead and right click on 64 bit version of Windows PowerShell, choose pin to taskbar. Hold down the shift key, then right click on the PS icon in the taskbar, then click properties, click shortcut, then click advanced, then check run as administrator, click ok then click ok again.


From the Taskbar, click your PowerShell Icon that you just created. Should come up in administrator mode
Now let’s go ahead and Customize the PowerShell console
- Right click the icon on the top left of your screen, click properties.
- The Properties dialog box includes four tabs – Options, Font, Layout and Colors. We’re going to dig into each one of them, starting with Options.
Options (Cover the Default Settings)
Click options

Cursor Size
- Small, medium, large
- Leave it at the default
Command History
- As you run commands they are added to the Command History in memory.
- Buffer size – # of commands that PS remembers – Use the up and down arrow keys to access the commands. The default is 50.
- Number of buffers – Controls the number of processes that can have their own buffers (memory) before the buffers get recycled. Default is 4.
While we’re here, I want to demonstrate two things
Command History and Quick edit mode.
(Be sure that you have opened PowerShell Console in Administrator Mode)
Now type the following commands:
- Type get-help get-process, press return
- Type cls, press return
- Now type get-history – Displayed is your command history
Herse’s some questions that you may have about Command history
Q: What if I want to run multiple commands from my history?
A: Here is a new command type Invoke-history 1; Invoke-history 2, press return.
As you can see we ran get-help get-process and get-help get-eventlog
Now, I want to demonstrate “quick edit mode”
Let’s say your lazy like me and you don’t want to type invoke-history twice
Click your up arrow once to bring up your invoke-history command.
Now back space until there is only one invoke-history.
Click your left mouse button and highlight invoke-history, then right click.
Then move the cursor over, allow for a space and right click
“Quick edit mode dropped that command right in there.
Click Return – It’s working

Server Academy Members Only
Sorry, this lesson is only available to Server Academy Full Access members. Become a Full-Access Member now and you’ll get instant access to all of our courses.


