
Creating Your Virtual Machines

Full-Access Members Only
Sorry, this lesson is only available to Server Academy Full-Access members. Become a Full-Access member now and get instant access to this and many more premium courses. Click the button below and get instant access now.
Instructions
Q&A (0)
Notes (0)
Resources (0)
Saving Progress...
Resources
There are no resources for this lesson.
Notes can be saved and accessed anywhere in the course. They also double as bookmarks so you can quickly review important lesson material.
In this lecture, we are going to create our first Virtual Machine for our lab.
Now, we are going to do this with VirtualBox so we are just going ahead and opening that application.
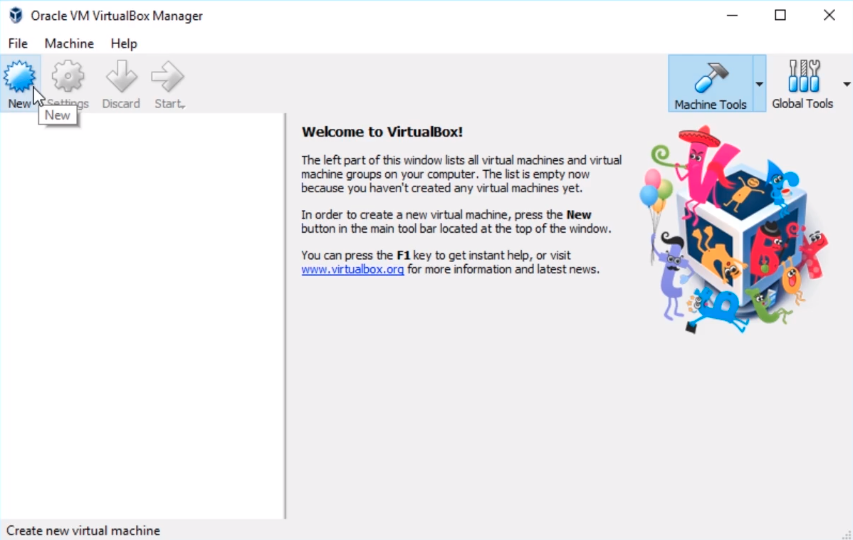
And, we have already created our Virtual Network. So, all we need to do is click on New on the left-hand side of the screen.
Now, by default, I’ve chosen to set this up by going to Expert mode. Most likely you will launch in Guided mode if you see a screen that looks like this.
What we are going to do is click on the Expert Mode button.
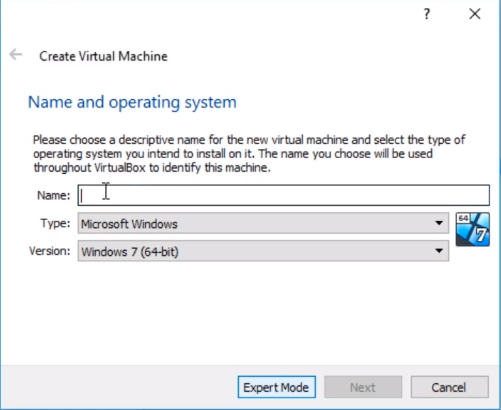
And, we need to type in a Name, and by the way, all that Expert mode does is reduce the number of pages that we have to go through, it really doesn’t add any more settings to it.
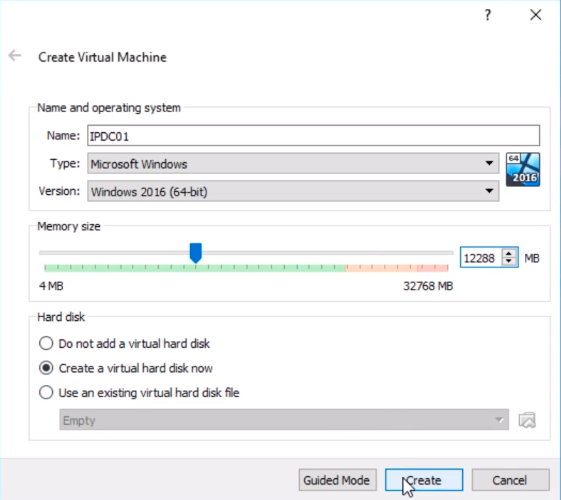
So, what we are going to do is Name the server. Now, we are naming the Virtual Machine in the VirtualBox inventory is not actually a computer name as on the Windows operating system, this is just for the VirtualBox inventory so just keep in mind that those are separate.
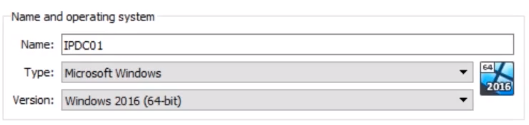
What I am going to do is I am going to name this IPDC01. I’m naming it IP for InstructorPaul because that’s my website and that is what my domain is going to be. I am naming it DC because I intend to make this a Domain Controller at some point, and I am naming it 01 because is the first Domain Controller that will be in my domain
Now, what we have here is the Type. We can choose Microsoft Windows, and under the Version, we are going to choose Windows 2016 (64-bit) since 2019 will probably not show in this list for quite a while so it’s perfectly acceptable to choose 2016.
Now, one thing you want to keep in mind is that if you see only (32-bit) versions here that means one of two things:
- You don’t have a 64-bit Operating System or 64-bit processor.
- You don’t have Virtualization Technology enabled in your BIOS.
So, keep that in mind if you encounter that issue, it’s usually an easy fix as long as you have a 64-bit Operating System.
Next, we need to choose how much memory we are going to allocate. Now, my computer is pretty powerful. I have 32 GB of ram, you are probably not going to have that much. For the ease of this course, I am going to go ahead and pump this up to like 16 GB of ram.
So, one way you can fix this is just by launching Task Manager and going to Performance. We can go to Memory and we can see how much memory your computer is using and how much is idle. I am using 13 GB out of 32 GB.
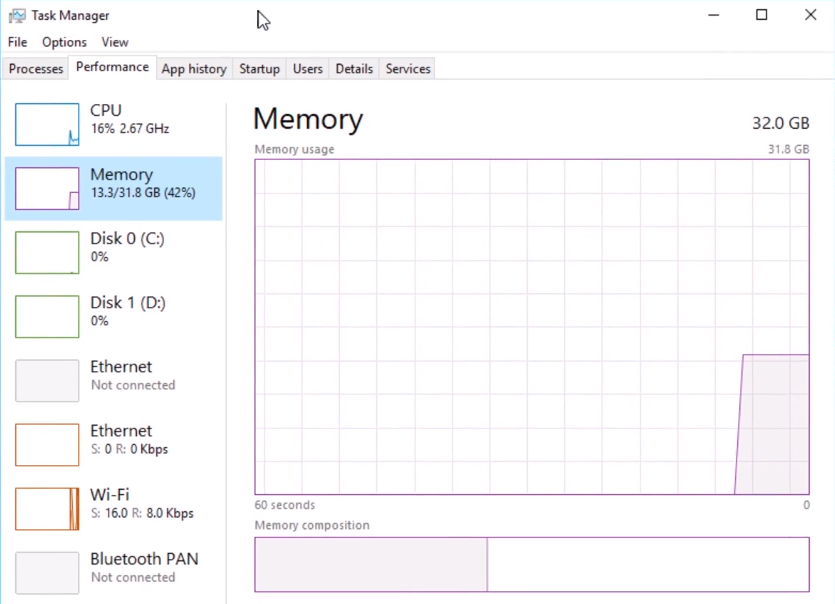
We can allocate around 12 GB of ram from the idle space just so I have some extra space in case another process starts up and needs memory. That’s a good way to tell how much memory we have available.

Now, under the hard disk, what we need to do is select Create a virtual hard disk now.
A summary of all the configurations is shown next. Click the Create button.
And, at this point, it prompts you to name the file, and choose a folder location. I am going to leave all these at the default, that’s perfectly fine. The file will be stored with the VM and will have the same name as the VM which is helpful.
Then we need to choose the file size. Remember the minimum requirements are 32 GB of storage for Desktop Experience. I am going to choose just 120 GB, and I am going to tell you the reason why I am doing that.
Server Academy Members Only
Sorry, this lesson is only available to Server Academy Full Access members. Become a Full-Access Member now and you’ll get instant access to all of our courses.


