
Creating, managing and deleting OUs

Full-Access Members Only
Sorry, this lesson is only available to Server Academy Full-Access members. Become a Full-Access member now and get instant access to this and many more premium courses. Click the button below and get instant access now.
Instructions
Q&A (0)
Notes (0)
Resources (0)
Saving Progress...
Resources
There are no resources for this lesson.
Notes can be saved and accessed anywhere in the course. They also double as bookmarks so you can quickly review important lesson material.
In this lecture, you’re going to learn how to create, manage, and delete Organizational Units within Active Directory.
Open Active Directory Users and Computers by selecting from Server Manager > Tools Active Directory Users and Computers.
Let’s create a new OU. Right-click on ad.serveracademy.com and select from the context menu New > Organizational Unit.

Let’s name the OU Server Academy.
Note that we have a checkbox checked to Protect the container from accidental deletion. We definitely want to leave it checked, since if we don’t, and somebody accidentally deletes it, will wipe out our entire infrastructure of users we are about to create under this OU.
Click OK.

We see now the OU has been created.

Now, right-click on the OU and choose New > Organizational Unit.
This is kind of my go-to when creating a new domain, I create a new set of OUs.

Name the OU Member Servers. This OU will be for my other Windows Server operating systems computers that are not Domain Controllers. Click OK.

Let’s create some more OUs repeating the steps and name them as follows:
- Member Servers
- Gaming Servers
- DCS
- Arma 3
- Gaming Servers
- Domain Users
- Domain Admins
The reason why we separate these out is because we can create Group Policy Objects and apply them to these OUs. That way, we can create a Firewall GPO and apply it to DCS for example, and another GPO for Arma 3 and so on.
If we right-click on DCS OU and select Properties.

We have the General Tab which if it is for a specific location for an office in NY for example you can enter that information here with a description.

The Managed By Tab displays and configures who manages this specific OU for example if you want to delegate the access, etc.

The COM+ is if you have partitions set up within Active Directory you can choose the partitions here. In a default installation, there are no partitions available.

We can also rename these OUs by right-clicking and choosing from the context menu Rename. Additionally, you can press F2 on the keyboard when the OU has been selected.
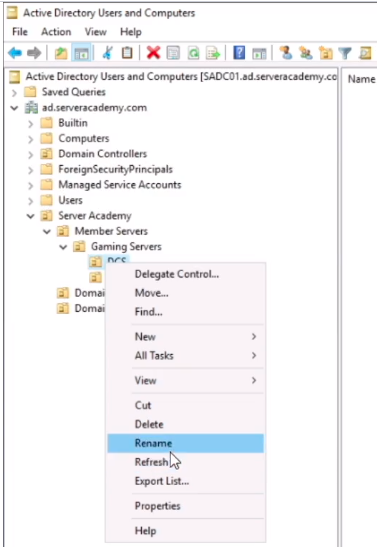
Here we can see we can rename the Server Academy OU when pressing F2.

If we need to delete an OU maybe when we do not have objects in them or are no longer in use.
We right-click the OU and from the context menu, we select Delete.

We have a pop-up that warns you like the following:

If we click on Yes we have an error pop up like the following:

The error is not related to permissions since we are administrators of the server. The issue here is that the OU is protected from deletion.
If we want to delete the protected OU we need to turn on Advanced Features. Click on View > Advanced Features.

This process reloads the Active Directory console and we are going to see more folders and containers. It might be difficult to understand it but the same information is still there with additional information.
If we expand Server Academy OU and expand Member Servers we right-click on Gaming Servers and select Properties.

And we can see we have some additional tabs now.

If we select the Object Tab we uncheck the checkbox Protect object from accidental deletion.
We can explore the other tabs to see what we are presented with. Click Apply and OK.

Generally, you would want to turn off Advanced Features by reversing the process. Click on View > Advanced Features.
Server Academy Members Only
Sorry, this lesson is only available to Server Academy Full Access members. Become a Full-Access Member now and you’ll get instant access to all of our courses.


i like the videos but the course resets all the time
Hi ana conda
There was an issue with the lesson progress, but it should be ok now. Let us know if you see any other issues.
Thank you,
Ricardo