
Managing WSUS Client Computers and Groups

Full-Access Members Only
Sorry, this lesson is only available to Server Academy Full-Access members. Become a Full-Access member now and get instant access to this and many more premium courses. Click the button below and get instant access now.
Instructions
Q&A (0)
Notes (0)
Resources (0)
Saving Progress...
Resources
There are no resources for this lesson.
Notes can be saved and accessed anywhere in the course. They also double as bookmarks so you can quickly review important lesson material.
In this lecture, I want to talk to you about managing your WSUS clients and how to create and manage computer groups within WSUS.
In IPWSUS01 open your WSUS management console and expand IPWSUS01 > Computers > All Computers > Unassigned Computers.
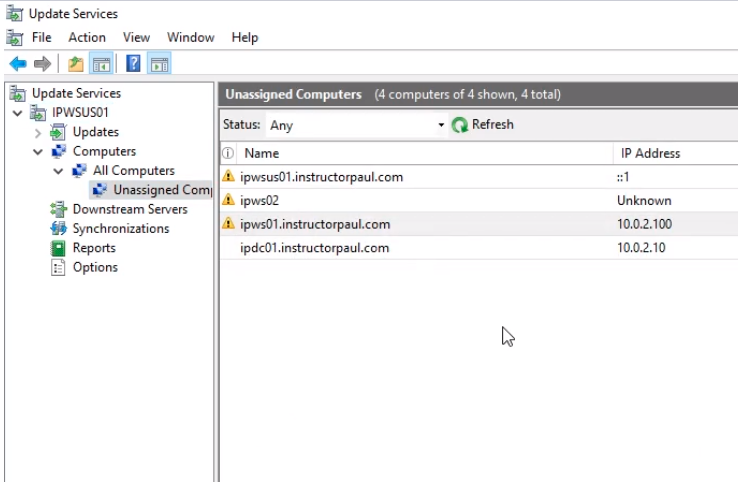
By default, everything is dumped into the Unassigned Computers group. If you are familiar with Active Directory it’s a bit like the Computers container: it is like the default slot for all your new computers to be added.
What we want to do is to organize things a little bit. It will be nice to split our Windows 10 operating systems into a Windows 10 group, and our Server 2016 operating systems into a Server 2016 group. We can also create a group for non-domain joined computers and things like that.
NOTE: When you are approving Windows Updates, you can approve them to certain computer groups. So, keep in mind that when you approve a Windows update and you approve all the updates to Windows Server 2016, Windows 10, Windows 7 if we are just approving them to all Unassigned Computers there is not going to be any issues with WSUS trying to install a Server 2016 update on a Windows 10 operating system. WSUS is smart to know if the update applies to the computer to which you approve the update.
What we want to do is organize our domain and keep it a little bit more structured. If you work in a large production environment it is a good idea to create Test Groups. If you work with Developers that do .Net development or build applications for Windows, you don’t want to approve a brand new update and deploy it to the whole domain because it could break things with your Developers. New patches change the way things work and will require code changes, so it would be a good idea for you to create a test group that only includes 3 or 4 computers and apply those new updates to the test group, and allow your testers to test the updates and make sure it doesn’t break anything before you deploy it to your entire domain. That’s the purpose of groups.
Let’s create a few computer groups. Right-click on All computers and select Add Computer Group…
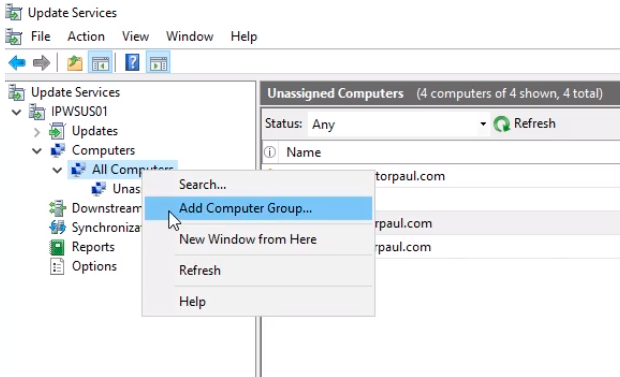
Name the group Server2016 and click Add.

Now, under Unassigned Computers select ipdc01 and ipwsus01 and right click and choose Change Membership...

Select Server2016 and click the OK button.

Now, if we click on Server2016 node we change the Status to Any and click Refresh we can see our two computers.

Let’s create another group by right-clicking on All Computers and selecting Add Computers Group...

Name the group Windows10 and click Add.

We move now the Windows 10 computer ipws01 by right-clicking and choosing Change Membership...

Select the Windows10 checkbox and click on OK.

We now create the last group for Non-Domain Computers. We can confirm the name by right-clicking the registry configuration file on our shared folder and clicking on Edit.
We can see the name is NonDomain.

Right-click the All Computers node and select Add Computer Group...

Let’s name this one NonDomain and click Add.

Change the membership of the last computer by right-clicking it and selecting Change membership...
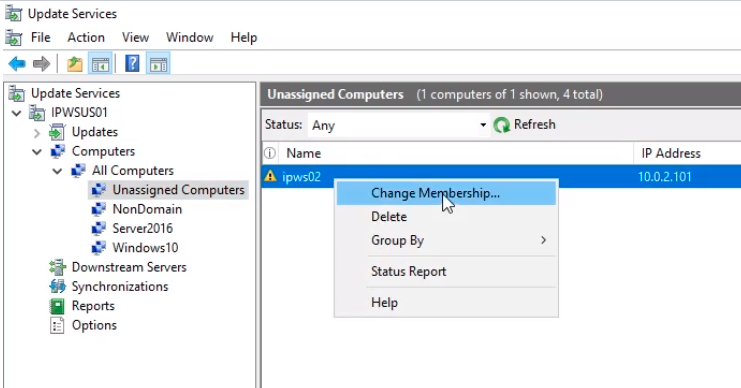
Select the NonDomain checkbox and click OK.

Non-Domain joined computers that use the registry file will be placed on the NonDomain group.
That is how you go about managing Computers and Groups within WSUS.
Server Academy Members Only
Sorry, this lesson is only available to Server Academy Full Access members. Become a Full-Access Member now and you’ll get instant access to all of our courses.


