
DNSSEC Client Install

Full-Access Members Only
Sorry, this lesson is only available to Server Academy Full-Access members. Become a Full-Access member now and get instant access to this and many more premium courses. Click the button below and get instant access now.
Instructions
Q&A (0)
Notes (0)
Resources (1)
Saving Progress...
Notes can be saved and accessed anywhere in the course. They also double as bookmarks so you can quickly review important lesson material.
In this Video we will:
- We will demonstrate a step-by-step hands-on Windows DNS Security (DNSSEC) client installation.
- We will define technical terms you will need as we progress through the installation.
- At the completion of this lecture you will gain valuable-work related knowledge and experience by utilizing and implementing the steps given in this lecture.
Prerequisites: You must have access to or have installed in your lab the following:
- One Windows 2016 Server with Active Directory installed and promoted to a domain controller (DNS installs automatically).
- Or a VM with the identical configuration.
- Some experience with Active Directory Group Policy Management Console would be helpful.
- Don’t forget to download the supplemental information that I have supplied with this lecture.
Adequate permissions will be needed
- To configure a DNS server that is running on a domain controller, you must be a member of the DNS Administrators, Domain Administrators, or Enterprise Administrators group.
Windows DNSSEC Client Installation
Windows client computers normally don’t try to validate DNS data, they must be told to validate the data. The best way to integrate DNSSEC into your clients is by using group policy.
Here is an overview of this lecture:
- We will create an OU called Protected Clients.
- Create a Group Policy Object called NRPT, which means, (Name Resolution
Policy Table)
This policy will state that any computer that is part of this OU must use DNS security validation.
- Configure the NRPT policy to define what part of the DNS environment this policy will affect.
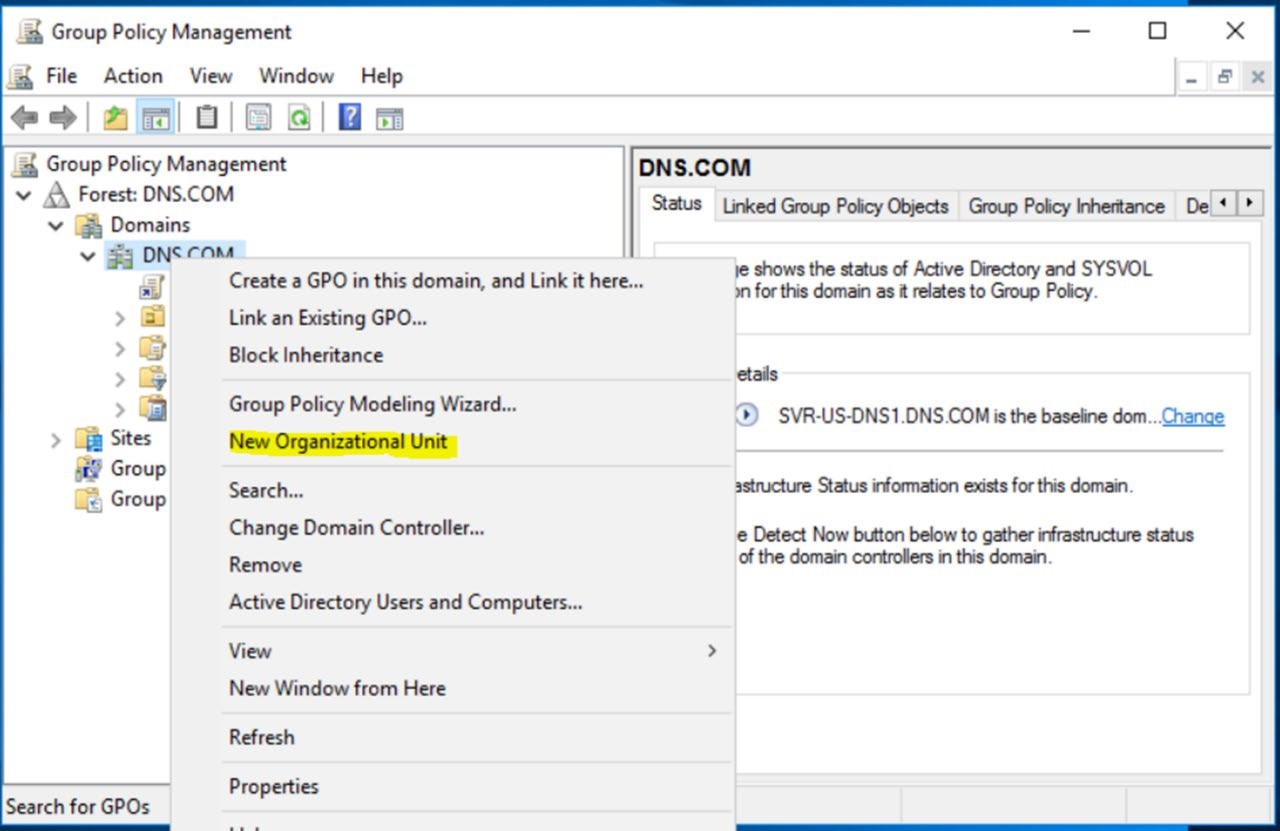
- Create an OU called Protected Clients
Open server management, tools, Group Policy Management.
Double click Domains, in this case I highlight DNS.COM. Right click on DNS.COM, New Organizational Unit, type Protected Clients, click OK.
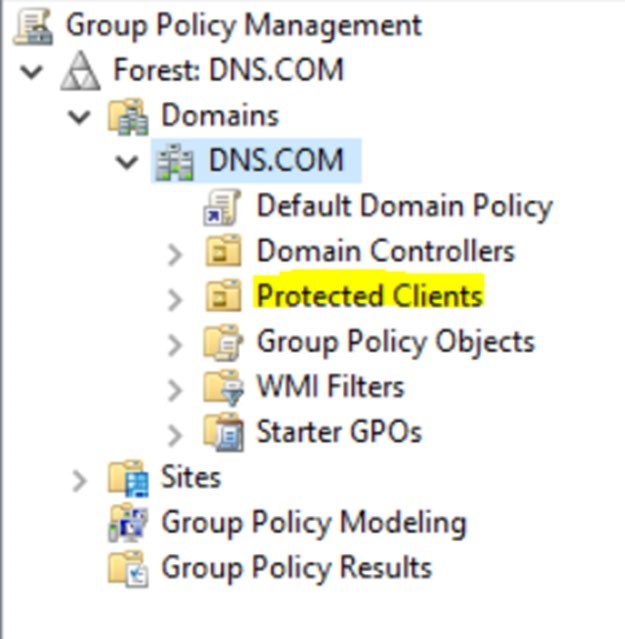
Double click DNS.COM, our Protected Clients OU is displayed.
- Create a Group Policy Object called NRPT Settings
Highlight the new OU Protected Clients, right click and select Create a GPO in this Domain. Type NRPT Settings, click ok
In this example, it is important to understand that this policy will only apply to computers that are in the Protected Clients OU and below.

- Configure the NRPT policy.
- Right click NRPT settings, then select edit. Under Computer Configuration double click Policies, double click windows settings, double click Name Resolution Policy. The Name Resolution Policy configuration page is displayed.
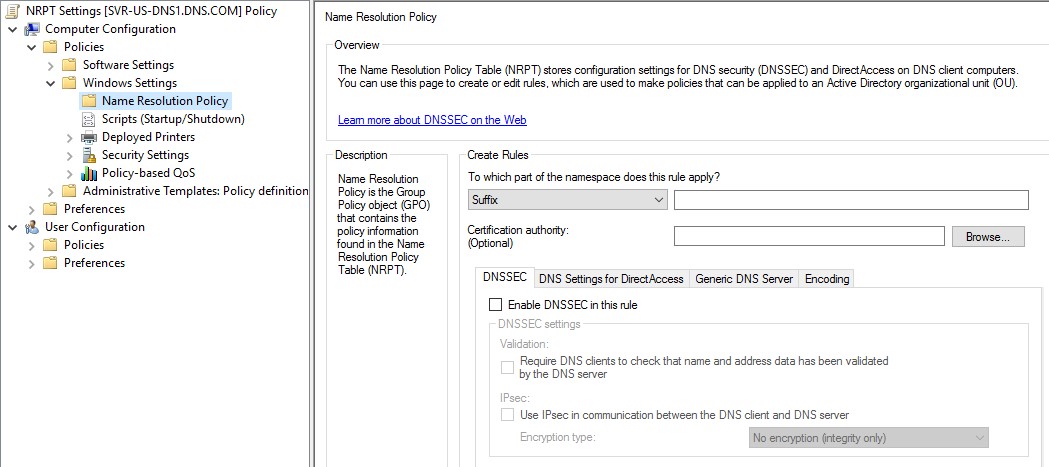
- Click the down arrow in the suffix box. Each choice will be explained. Suffix: In our example DNS.COM is the suffix.
Prefix: Is the hostname for example – SVR-US-DNS1 is the prefix.
FQDN – In our example the FQDN of the host is SVR-US-DNS1.DNS.COM Subnet (IPv4) Select this if you are configuring a policy for reverse IPv4 lookup queries.
Subnet (IPv6) - Select this if you are configuring a policy for reverse IPv6 lookup queries.
Any – If any is selected then all queries will be controlled by the policy you set for this NRPT entry.

We choose Suffix, then type DNS.COM
- Under DNSSEC check enable DNSSEC, under Validation check Require DNS clients to check that name and address data has been validated by the DNS server.
- Check IPSEC – This scrambles the communication between the DNS client and the DNS server. From Encryption type click the down arrow and select High: AES (192,256)
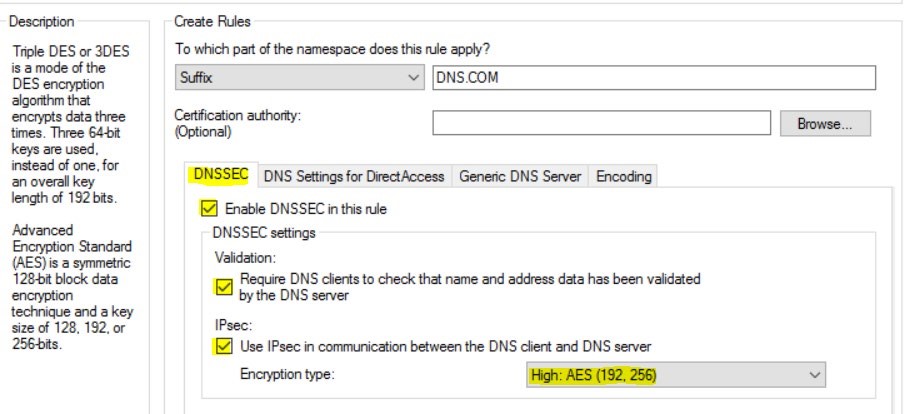
- Click the create button, scroll down, then click apply.

The Name Resolution Policy Table is now ready for use
The last thing you need to do is open ADUC and move some computers over to the Protected Clients OU. Go back to Server Manager, tools, ADUC. Click the computers container, highlight the computers that you want secured and move them over to the Protected Clients OU. In my case I highlight BPhilips, hold the shift key down, select rhill, let go of the shift key, right click and drag the computers to the Protected Clients OU, then click move. Now when one of these computers logs onto the domain the policy we just created will run on that computer.
Server Academy Members Only
Sorry, this lesson is only available to Server Academy Full Access members. Become a Full-Access Member now and you’ll get instant access to all of our courses.


