0%

0/1 Lessons

Course Introduction

• 10min

0 / 2 lessons complete

DNS Basics

• 1hr 16min

0 / 8 lessons complete

DNS Resource Records

• 46min

0 / 5 lessons complete

DNS Zones

• 3hr 41min

0 / 12 lessons complete

DNS Delegation

• 50min

0 / 4 lessons complete

DNS Security Techniques

• 36min

0 / 5 lessons complete

Advanced DNS Topics

• 22min

0 / 5 lessons complete

DNS Security (DNSSEC)

• 1hr 16min

0 / 6 lessons complete

DNS Policies

• 54min

0 / 6 lessons complete

PowerShell for DNS

• 1hr 27min

0 / 6 lessons complete

Troubleshooting DNS Issues - Troubleshooting Tools

• 1hr 39min

0 / 8 lessons complete

Creating a Forward and Reverse Lookup Zone

Instructions

Q&A (0)

Notes (0)

Resources (1)

Saving Progress...

Notes can be saved and accessed anywhere in the course. They also double as bookmarks so you can quickly review important lesson material.

Create note

In this Video: 

  • We will Create a Forward and a Reverse Lookup Zone, using the DNS Server Wizard.
  • We will discuss Zone types
  • How DNS Data is Replicated
  • We will cover Dynamic Updates

Prerequisites: You must have access to or have installed in your lab the following:

  • Windows 2016 server with DNS and Active Directory installed and the server promoted to a domain controller.

Adequate permissions will be needed.

  • To configure a DNS server that is not running as a domain controller, you must be a member of the Administrators group for that computer.
  • To configure a DNS server that is running on a domain controller, you must be a member of the DNS Administrators, Domain Administrators, or Enterprise Administrators group

Creating a Forward and a Reverse Lookup Zones

  • Using the DNS Server Wizard 
    1. Open Server Manager, Tools, DNS
    2. Right click on the server, select configure a DNS Server
    3. Welcome to the Configure a DNS Server Wizard is displayed, select next
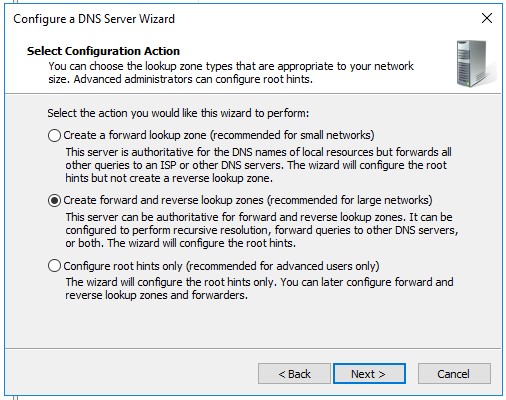
    4. Three choices are displayed. For this lecture we select the second choice, next.  
  1. Click yes, then next.  

Zone Type: Here various types of zones and storage are displayed.

Choose the type of zone and where the DNS database will be stored

  • Primary â€“  A primary zone is a DNS zone that is the primary source of information.
  • Secondary â€“ A secondary zone is a read-only replica of a primary DNS zone that is hosted on another remote DNS server.
  • Stub Zone - A stub zone is similar to a secondary zone in that it is a read-only zone that obtains its information from other DNS servers.
  • Store the zone in Active Directory â€“ Selection may not be available or greyed out. Only available if DNS server is a writeable domain controller (has Active Directory installed)
  1. Select Primary Zone,  
  2. Keep the Default, Store the zone in Active Directory. Click Next

Active Directory Zone Replication Scope

  1. Select the default – To all DNS servers running on domain controllers in this domain: DE.DNS-ZONE.COM
  2. Click next

Zone Name

1. For this lecture I typed DE.DNS-ZONE.COM,  2. Click next

Dynamic Updates – What type of updates will be allowed in this zone. 

  • Allow only secure updates – Recommended for Active Directory, available for Active Directory-integrated zones.
  • Allow both nonsecure and secure dynamic updates – Not recommended, considered a security vulnerability.
  • Do not allow dynamic updates – Records must be updated manually.
  1. Select the default – Allow only secure updates
  2. Click next, then yes to create a reverse lookup zone, next

Creating a Reverse lookup zone – This zone is useful for troubleshooting Zone Type

  1. Select the default settings
  2. Click next

Active Directory Zone Replication Scope

  1. Select the default settings
  2. Click next

Reverse Lookup Zone Name – Translates IP addresses into DNS names. 

  1. Select the default settings
  2. Click next
  3. In this case I typed 192.168.0
  4. Click next

Dynamic Update

  1. For this lecture we will choose allow only secure dynamic updates
  2. Click next
  3. Click no, it should not forward queries, next, finish

Congratulations you have just finished this video. I hope you found it enjoyable as well as informative.

Thanks for watching and we will see you in the next lecture.

Server Academy Members Only

Sorry, this lesson is only available to Server Academy Full Access members. Become a Full-Access Member now and you’ll get instant access to all of our courses.

1 1 vote
Lesson Rating
Subscribe
Notify of
profile avatar
0 Comments
Inline Feedbacks
View all comments