
Configuring Response Rate Limiting

Full-Access Members Only
Sorry, this lesson is only available to Server Academy Full-Access members. Become a Full-Access member now and get instant access to this and many more premium courses. Click the button below and get instant access now.
Instructions
Q&A (0)
Notes (0)
Resources (0)
Saving Progress...
Resources
There are no resources for this lesson.
Notes can be saved and accessed anywhere in the course. They also double as bookmarks so you can quickly review important lesson material.
If you recall Response Rate Limiting is a way to prevent amplification attacks on your DNS server.
In our example
- The Bot commander issues a command to many computers (bots)
- Commanding that the bots request several DNS servers to send back data but instead of sending back all that data to the source, the DNS servers are spoofed into sending all the DNS zone data to the target DNS server instead.
- This target server is soon overloaded and what you end up with is a Denial of service or DDOS attack.
That is why we need to configure Response Rate Limiting on our DNS server.
Here are the two RLL commands that we will be using.
- get-DnsServerRRL – Displays the default RRL values
- set-DnsServerRRL – Configures Response Rate Limiting
Open Powershell and type:
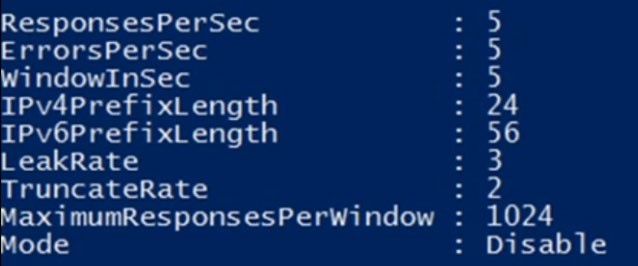
- Get-DnsServerRRL and press return
Displayed are the default RLL values. You can change these values with the setDnsServerRRL command.
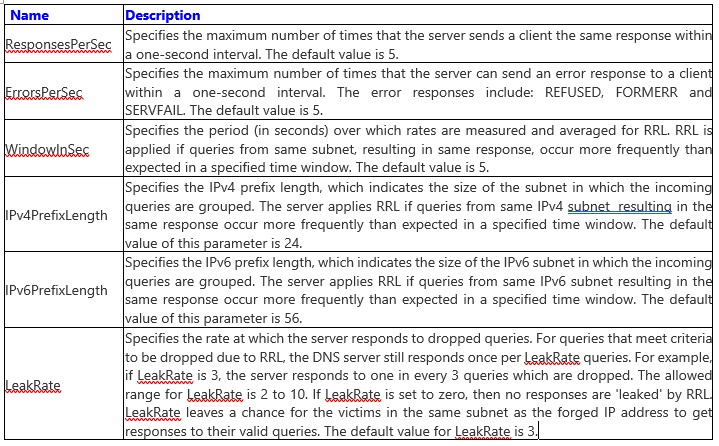
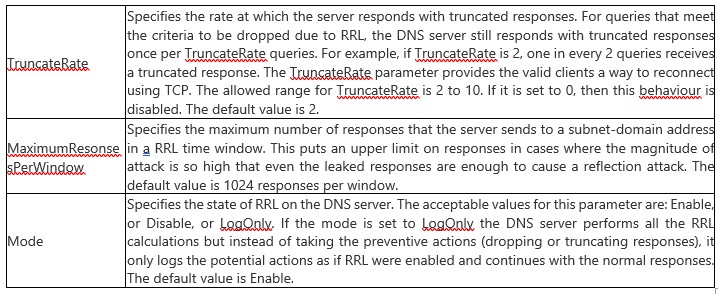
I’ve provided a chart as part of the documentation that describes all the parameters in detail associated with the command Set-DnsServerRRL.
- Parameters add additional functionality to the basic command.
At the bottom of the chart notice the mode command
Read the description from the video. Here is the short version from the description
- Mode – Set to enable or disable or logOnly. By default set to disabled
- If you set LogOnly – This would tell you what RRL would have done if it had been enabled during an attack. You can set this to LogOnly to see if there is any negative impact by running RRL from your clients.
The Chart (slide 5) below explains each parameter in detail (Sl6)
Let’s go back to PowerShell
To enable RRL type: (SL 7)
- Set-DnsServerRRL -Mode Enable
press return
Click yes or press Y
- Type Set-DnsServerRRL -Mode LogOnly press return
Press Y
Normally in a production environment if you only wanted to test the effects of Response Rate limiting on your network you would not enable RRL you would only use the logonly parameter.
Open Event Viewer
To checkout the log only function by opening the event viewer on the DNS server.
- Click Application and Services Log, Microsoft, Windows, DNS Server, Audit – And you should see RLL_OP
- You can right click on Audit and go to view you can checkout the Show Analytic and Debug Logs. In this case there is nothing there because RRL has not been running.
- Click Audit and then checkout the information log
- That will allow us to see the logs for Response Rate Limiting.
Go back to PowerShell
At the top of your screen you will see this warning: (SL 8)

What this is all about is that there could be a bunch of legitimate queries that come in and if RRL is setup, the DNS server may think that there is a amplification attack when the queries are from a legitimate source.
So, what you can do is setup an exception.
- For example, if you have a subnet such as 192.168.2.50
That you know may have a lot of queries coming in. You can add that subnet to your exception list.
- Add-DnsServerResponseRateLimitingExceptionlist -Name “subnet2” -ServerInterface
“EQ,192.168.2.50”
Here you have a subnet named subnet2 and a server interface with the IP address of 192.168.2.50. What this command is saying is that if a flurry of requests come in on that interface equal to that IP address than let those requests pass.
- To turn off RLL, type Set-DnsServerRRL -Mode disable • To reset RRL back to the defaults type
- Set-DnsServerResponseRateLimiting -ResetToDefault To verify that the settings are back to default type.
- get-DnsServerRRL – Displays the default RRL values
Server Academy Members Only
Sorry, this lesson is only available to Server Academy Full Access members. Become a Full-Access Member now and you’ll get instant access to all of our courses.


