
Installing the AD DS Server Role

Paul Hill
February 11, 2021 • 3 min read
In this lesson you are going to learn how to build an Active Directory domain an by installing the Active Directory Domain Services role.
Take your Active Directory skills to the next level with our free Active Directory Fundamentals course. Check it out below!
We offer more advanced Active Directory courses as well.. but that is our starter course that includes video lessons, quizzes, IT labs and more!
Domain Controller Prerequisites
Before you install the AD DS server role you need to make sure that your server has a static IP address.
Step 1. Run ipconfig /all
If you’re not sure about what IP you should assign you can open CMD and run the “ipconfig /all” command.

Once you run the command look for the: IPv4 Address, DNS Server and Default Gateway.
Step 2. Assign a static IP address to your domain controller
To assign a static IP address open Server Manager and click the blue text next to your ethernet adapter:

Now you right-click your ethernet adapter and select Properties:

Turn off IPv6, select IPv4 and click Properties:
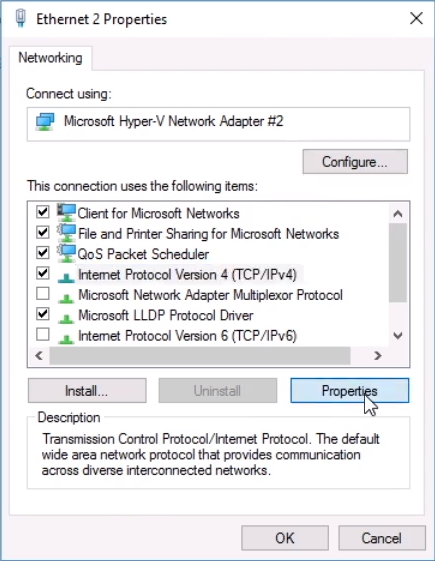
Enter your desired IP information using what you got from the ipconfig /all command above. I am going to use the following settings:

Click OK and close the network windows and dialogs. Refresh Server Manager. You should now see your static IP address assigned to your server:

Step 3. Test your network connectivity
It’s a good idea to make sure you still have network connectivity before proceeding on to the next step. You can test this by opening your web browser and making sure you still have internet connectivity (if you had it before) and by pinging local network resources in CMD (in my lab, I can ping the default gateway / 10.0.0.1 for example)
Installing the AD DS Server Role
Step 1. Open Server Manager
To install DHCP, open Server Manager by clicking the Windows button and clicking Server Manager or by searching for Server Manager.
Step 2. Add roles and features
Inside of Server Manager, select Manage > Add Roles and Features:

Step 3. Proceed to the Server Roles page
Now click Next until you reach the Server Roles page. Click the Active Directory Domain Services checkbox:

This will make the Add Roles and Features wizard appear. This will automatically add the required features to this server for the AD DS server role. Leave the settings at default, then click Add Features:

Step 4. Begin AD DS Server Role Installation
Now click next until you get to the Confirmation screen then click Install:

Step 5. Wait for installation to complete
Now you just need to wait for the installation to complete. You can close the dialog while the install is in progress or you can leave it up:
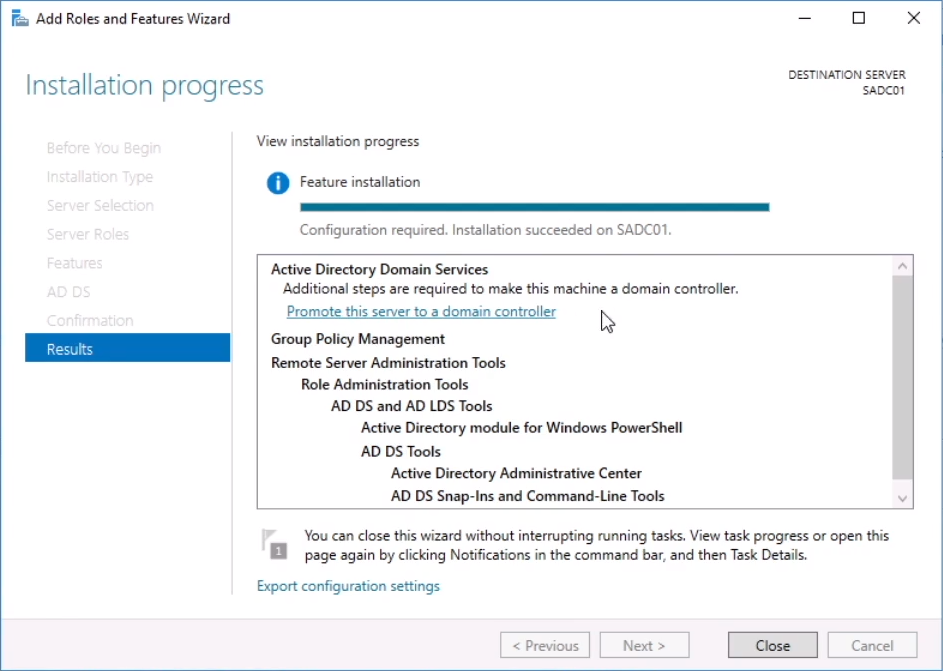
The next step is to promote the server to a domain controller which we will cover in the next tutorial. If you closed the install dialog you can click the notification flag and select the Promote this server to a domain controller:

Next Steps
The next step is to promote the server to a domain controller. That will be covered in next weeks tutorial – so I will see you there!

Sign up free and start learning today!
Practice on REAL servers, learn from our video lessons, interact with the Server Academy community!